Sunday, September 30, 2007

Flying with camera gear

A question that I am frequently asked is how I carry my camera gear when travelling by plane. With all of the delays, missed connections, and damaged, stolen, or lost luggage these days, it can be quite stressful getting to your destination even if you don’t check any baggage.
The solution that has worked for me is coming up with a “travel kit” of gear that takes up very little space and will cover 99% of anything I ever want or need to shoot. I pack that gear into an “Airport Addicted” backpack made by Thinktank Photo along with most of my clothing. The airport addicted bag was designed to hold the maximum amount of gear possible while still meeting most airline carry-on restrictions. You would be amazed at what I can stuff in this bag and along with my expedition 5 backpack (loaded with the rest of my clothes) carried on as my one “personal item”, I can fit everything I need for a 5 day trip without having to check a single piece of luggage.
When I arrive at my destination, I simply move all the camera gear into my smaller backpack and move all of my clothes into the large one until I’m ready to head back to the airport.
The only down side to this is that the bag can get quite heavy, usually around 40 pounds fully packed, when you have a long way to walk! They have since come out with a “roller” version of this bag and if I traveled a lot more, I would seriously consider getting one.

Now that I’ve covered how I get my gear from here to there, I’ll share what I take and why I feel it’s such a good balance of function and space savings.
99% of what I shoot is between 17-200mm focal length. This includes macro work but a dedicated macro lens is fairly limited so I choose to carry a set of extension tubes to use with my 70-200mm lens. Throw in a 2X tele-converter and that one lens lets me shoot from extreme close-ups all the way out to 400mm. (That in itself is the most practical combination in my line-up.) I then bring a 17-40mm, and a 28-70mm and that’s it! They all share the same filter diameter which cuts down on accessories needed as well. My tripod, with the ballhead removed, attaches to the outside of the bag, my flash cards, spare batteries, and assorted filters are all tucked away in separate zippered compartments inside.

Here are some images of this set-up I quickly shot today while packing for my upcoming workshop in Maine with Kathleen Clemons. We will be driving the coastline of Maine for 4 days, shooting everything from lighthouses to lobsters, and I know that I have all the gear I need for anything that we find along the way.


Ron Goldman
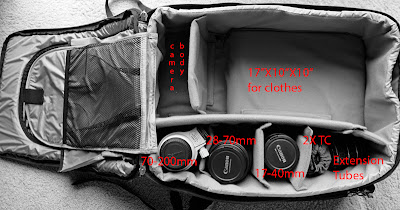

As you can see, there is plenty of room left for clothes in the main compartment, and there is a laptop compartment on the reverse side as well.
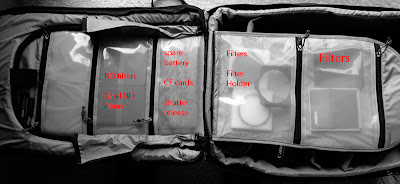


All of my accessories fit nicely in the top flap compartments.
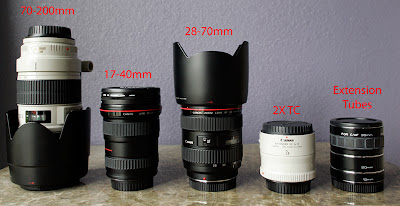

My "travel kit". Small, lightweight, and very functional.
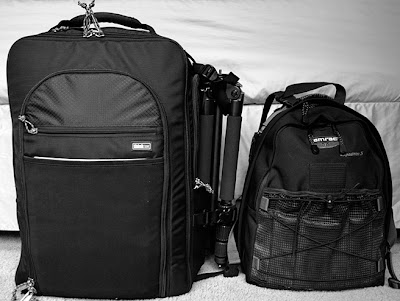

Both bags packed and ready to go. My small travel tripod is attached and the ballhead is safely stored away inside.

Wednesday, September 26, 2007

I think I'm done with the boring quickie socks with 2 strands of DK weight yarn. Most of my DK weight is gone and as you can see, I keep running out of colors while knitting the 8-hour socks.


I'm making the Cathedral Mittens which is a Lizbeth Upitis pattern from Homespun Handknit. I'm going to have to add some black and other colors to the cuff later as embroidery to make the colors work better. It has been years since I knit a slip stitch pattern but I'm amazed at how slowly it is going. I could have knit 3 color rows faster I think.

Friday, September 21, 2007


Peaches hopes everyone spends a relaxing weekend in their favorite box.
She is exhausted from a week spent napping, begging for more food, and tossing wastebaskets around loudly at 3 am.

Puppy Gone Wild

Tuesday, September 18, 2007

Bewitching Gloves

A dark cave.
In the middle a cauldron boiling.
Thunder.
Enter the 3 witches.

So begins Act IV, Scene I from Shakespeare's Macbeth.
Of course it is sunny and very hot here and nothing is cooking in my cauldron but here are my Halloween gloves with the chorus of the three witches on the gauntlet cuff.


I used Knitpicks' Palette: almost an entire skein of black, a small amount of white and less than 2 yards of red and orange. The cuffs use size 3mm dpns or circs and the hands and fingers use size 2.5 mm. The pattern is HERE.

I'm not quite sure what to knit next although my project to knit up all my DK weight yarn into thick socks continues. I hope some cold weather arrives soon to give me more knitting energy.

Monday, September 17, 2007

Need An Idea? Try Panning!

St. Petersburg

So I found myself standing in downtown St. Petersburg, Florida one late afternoon with my camera in hand. Since I have been working on my book project of Tampa Bay, I have shot just about every interesting building and landmark the city has to offer, but it was too early to go home.

Being that it is still the wet season in Florida (where it rains for about 30 minutes about every day), the skies were grey, and very little sunshine was abound. So, instead of packing up and heading home, I headed down to Bayshore Boulevard and sat down on the curb to try a real fun technique, panning.

St. Petersburg is a great place to pan, whether it is cars, from the ordinary to the exotic, but also people, bicyclists, skateboarders, buses to just about anything that is moving down the boulevard. Since the skies were overcast, it was perfect to get some nice slow shutter speeds without the use of a 2 or 3 stop neutral density filter.

I found a good spot on the street that I observed where a fair amount of traffic would go by, and typically at a pretty consistent speed, which would make it easy to pan. I set my camera in Shutter Priority mode, and set my shutter speed at 1/20th of a second to start. My ISO was set at 100, so all I had to do was track the subjects as they moved by. The other critical setting was to but my camera into Servo Mode, which will track my subjects as they came speeding by. I also made sure I was in burst mode, which depending on your camera make, will fire off several frames a second which will help get that perfect picture.

For the rest of the afternoon I sat there and panned subjects, and once you get the hang of it, it is a great way to get some very unusual and creative shots. So the next time you run short of ideas, give panning a try, you'll have a blast doing it!

Tampa WorkshopTampaTampa
St. PetersburgSt. PetersburgSt. Petersburg
Tampa BayTampa BayTampa Bay

Robert La Follette
www.robertlafollette.com

Pup Mie


Pup Mie

BatDog?


And Im a Batdog

Huaa


and I said huwaaaaa...

Friday, September 14, 2007

The gloves are finished and I'm just waiting until DH gets a chance to photograph them this weekend. I will put the pattern online at the Lulu store soon after.

Someone was thrilled to receive a package from Bunny Bytes this week. Here she is showing off some of her new chew toys. Rabbits need to chew and I need to do a better job of finding her things to chew. Otherwise she just uses my beloved cookbooks to exercise her teeth.


Wednesday, September 12, 2007

Model Shoot

Fort De Soto

For the past several months, I have been working on my project that is a coffee-table style book of photos of Tampa, St. Petersburg and Clearwater, Florida. I finished about a month ago the entire shoot list, and is now at the publishers for layout and design. During the project, it was decided that the book title needed to be changed to "Tampa Bay: A Photographic Portrait" since I covered the entire bay area, and the original cover shot needed to change.

I had a conference call with the publisher, and we decided that the cover needed to be generic in nature, but also show the beauty of the area, and the number one reason why the Tampa Bay area is a popular vacation, tourist, place to call home. So after tossing around some ideas, it was apparent that the shot needed to be of the beach, and one that shows how peaceful, relaxing and beautiful it is. So I had my marching orders, so I thought about the shot for a few days, and then it hit me.

I enlisted the help of my wife to be the model, and my good friend John to assist with a ladder. Ok, so you may be asking yourself, "what does a ladder have to do with the beach, much less the shot?". The answer is simple, and that is perspective. I know from past experience that the higher I get off the beach, the more of the beach I will get, as well as strong leading lines in the composition. A couple of days before our planned shoot, I did some test shots at Honeymoon Island, and they confirmed my idea.

We all met at Fort De Soto Beach early Sunday morning, when the sun was low on the horizon, and the golden light was just right. We gathered up our gear, and dragged out a six foot ladder out onto the beach, with some very strange looks from those who were already there, since most likely they have never seen anyone take a ladder to the beach. We made our way down the beach to the perfect spot that I have shot from numerous times in the past, but never from a high perspective.

I got everything set up, checked my settings, and then began to experiment with different shots for the next hour. Dawn was perfect and the shots came out even better then I had hoped for. While I was shooting, John took numerous shots of me at work, for he thought it was funny to see me standing on a ladder about ten feet above the beach, but they show a rare glimpse of how to set up a shot that is uniquely different then most ever taken at the beach.

----------
View The Cover of "Tampa Bay: A Photographic Portrait"
(JPG - 112KB)
----------

I filled up a card full of images during the hour we shot, and the end result will be showcased on the cover of the book when it is released early next spring. Just goes to show that with a little careful and creative planning, you can create an image that looks different then most, and a great exercise in taking your photos to a whole new level.

(Click on the thumbnails for a larger photo)
Fort De SotoFort De SotoFort De Soto
Photos courtesy of John Jacobsen

Robert La Follette
www.robertlafollette.com

Tuesday, September 11, 2007


Last year I read about the 100 mile diet and was inspired to do a local Thanksgiving feast. Unfortunately I couldn't find enough local ingredients to do it. But inspired by the Eat Local Challenge blog, I tried again. To make my life a little easier I expanded my horizons farther than 100 miles and used some local items with non-local ingredients. Still it was more of a challenge than I expected. I usually serve a salad with dinner but I couldn't think of a way to do a salad dressing with local ingredients.

Flour Tortilla - New Mexico Tortilla Company in Santa Fe

Fresh Eggs with Beautiful Orange Yolks - Los Poblanos Organics in Albuquerque (our CSA/Organic Delivery Service)

Montelores Pinto Beans - Dove Creek, Colorado

Hatch Roasted Green Chiles filled with wonderful goat cheese from The Old Windmill Dairy, Moriarty, NM

Green Chile Roll from Fano Bakery in Albuquerque

Everything topped with salsa - orange tomatoes, onions, and garlic from Los Poblanos Organics and jalapenos from my friend Joelle's garden

Friday, September 7, 2007

7 Golden Retriever puppy For You


They are so ccccccccccccuuuuuuutee !

Cute Golden Retriever puppy


Cute Golden Retriever puppy

Flying Chihuahua


I can fly too!


I think I am going to make the gloves a bit longer so they almost reach my elbow. I have this silly idea I can finish both gloves this weekend. I know the second sock or mitten or glove always knits up in half the time but I am probably being unrealistic. I'm using Palette and first I need to see if I have another skein of black before I make them longer.

For Melinda and Janey, HERE's the Spin-Off sock book. All the socks in the booklet are knit in handspun and there is quite a variety. The Fireside sock pattern from the booklet, designed as a way to use up a bunch of handspun yarn, is my template for all my thick socks using 2-strands of DK weight yarn. The booklet is well worth the $9.95 price. The full title is Socks: A Special Publication for Knitters and Spinners edited by Rita Buchanan and Deborah Robson. HERE's a photo of the cover.

Thursday, September 6, 2007

Hubert Dupras' little art workers


The images above illustrate the results of an unusual artistic collaboration between the French artist Hubert Duprat and a group of caddis fly larvae. A small winged insect belonging to the order Trichoptera and closely related to the butterfly, caddis flies live near streams and ponds and produce aquatic larvae that protect their developing bodies by manufacturing sheaths, or cases, spun from silk and incorporating substances—grains of sand, particles of mineral or plant material, bits of fish bone or crustacean shell—readily available in their benthic ecosystem. The larvae are remarkably adaptable: if other suitable materials are introduced into their environment, they will often incorporate those as well.


Hubert Duprat is one of those beautiful cases of scientist-turned-artist that makes me happy. Nature as a poietic element might not be anything new - after all, the wind does make magnificent drawings, and the sky is filled with clouds. Yet somehow, this is different. What possibly fascinates in this case is the fact that a live creature brings to life a work that seems to have the intelligent design typical of human activity. And it's not just about the art. Notice the difference between this and an elephant with a paintbrush: here, it is not the bare similarity with a man-made work of art that fascinates, but rather, the game between the demiurge and its work-turned-artist.
Once the stage is set, the director moves back, as his performers create.

See also the larvae in an action film.

(via)


I just found out there were several errors in the heel of my free pattern for the Caledonia socks. I apologize to any of you who tried to knit the socks and had problems. I have fixed the errors so if you do plan to try these socks, please go and print out the revised version of the pattern.

Kisha Puppy


Kisha Puppy

Wednesday, September 5, 2007


Here are the Halloween gloves in progress (and badly in need of blocking). These are taking longer than I expected due to an incident involving a knife, an onion, and my finger. It really is tough to knit fast with a bandaid on your finger.

Not much else is going on here - I have 431 lbs of fresh tomatoes to deal with and I'm trying to plan an armoire for my yarn storage. DH has promised to make me whatever I like so I need to go look at photos of crafts rooms to get some ideas.

The Great Power of NO Color


by Danilo Piccioni

When thinking of black and white photography, the worst thing one could think is that B&W is a photograph without any color. It would be just as bad as thinking that a color image is a B&W photograph infested with colors. There are sixteen million shades of gray in the B&W world; trust me when I say that's a lot. There is no reason to think that a B&W picture is in any way inferior to a color one.

Typically a non-digital B&W shooter would use a colored filter attached to the camera; the filter allows the photographer to see the scene in B&W through the viewfinder so that he can decide how to shoot reality at its best using a different-color filter, e.g. yellow, red, green.
Today’s mid-range digital cameras have the option of shooting directly in BW or in color.
Now you just shoot and then decide later, and if you want, you can have them both.
If you are serious about B&W photography, you want to capture your exposures in color first, then convert it into B&W later in your Photoshop darkroom.

There are many different ways to create a B&W photograph in PS from a color shot. The worst thing you could do to your photograph is to chose the one-click method, to convert the color photo to grayscale.
These sample photographs show you the difference between a photograph that was converted with this automatic PS feature and the versions achieved by working with other methods in PS.
This and other tricks and techniques will be explained in full detail in my B&W course here and only here at Perfect Picture School of Photography.

Danilo Piccioni © 2007

River Rapids

Hillsborough River State Park

It started out overcast one morning, so this would be the perfect opportunity to head up to Hillsborough River State Park in Tampa, Florida and shoot the rapids. Now, Florida is about as flat as it gets, so I wasn't really expecting to see anything all that spectacular. Since I have been up to the Oregon Coast and saw some of the most amazing waterfalls and rapids, I knew the grey skies would be perfect.

Hillsborough River State Park is about as old-time Florida as I have ever seen, for it was thick, swampy and dark on the trails as I have seen to date. The Palms, Oaks, Cypress' and Pines tower above the landscape, and the star attraction, the Hillsborough River, runs right through the middle of the park.

In one portion of the river, the water rushes over some rocks, and the tallest rapids was about six inches high (yes, you read that right). In any case, getting in the water and down low provided some very unique and compelling compositions. The techniques to capture moving water is simple... First, you need an overcast day, which will give you slower shutter speeds, as well as avoid the deep contrasts and blown highlights.

Next, you need to set your gear up, which in this case includes a 2 or 3 stop Neutral Density filter, and a Circular Polarizer as well. The ND filter is used to allow for slower shutter speeds, since depending on which filter stop you have, it will cut your light in either 2 or 3 stops. The Polarizer is also handy, since it too will reduce the amount of light (resulting in slower shutter speeds), but also intensify any green colors, as well eliminate any reflections on the water itself (just as if you were wearing polarized sunglasses).

For the final items, a tripod is a MUST, for there is no way you can handhold your camera at the required shutter speed to capture the water as if flows over the rocks. Also, another good item is a remote release cable, and a bubble level to keep those horizons straight.

After everything is ready, now all you need to do is concentrate on composition, and the best ones are with your wide angle lens, ISO set at 100, and your aperture set at f/22, move around the area, get low, and look through your viewfinder to seek out that award-winning shot. Rule of thirds apply here, so keep that in mind as you work your area. Also, low perspectives are the best, since you bring the action right into the viewer, almost if they are standing right there with you.

Once you get into the groove, all that is left is to vary your shutter speeds to see what results you capture, for each shot will result in a totally different look and feel, and overall, is a great way to spend an overcast day out in nature, and have fun doing it!

(Click on the thumbnails for a larger photo)
Hillsborough River State ParkHillsborough River State ParkHillsborough River State Park

Robert La Follette
www.robertlafollette.com